Bicycle assembly instructions
Safe on the road
Every bike we sell goes through assembly, adjustments and checks by our professional mechanics. We do most of the work, but for packaging reasons, a bike you order from our online shop will need a final touch from you. But don't worry, the job is not overwhelming and the instructions below will help you avoid mistakes. And if you're unsure about any of the steps, you can always give us a call, we're happy to help!
Pedals
To install and tighten the pedals, you will need a pedal wrench or a 15 mm spanner.
Some pedal models are tightened with an Allen key (6 or 8 mm) through the hole in the pedal comb.
The pedals on a bike you order from the online shop may have been twisted to the “inside” of the pedal cranks during delivery.
Of course, they must first be removed and correctly fitted to the pedal clamp.
In the instructions below you can see the tightening directions for both pedals.
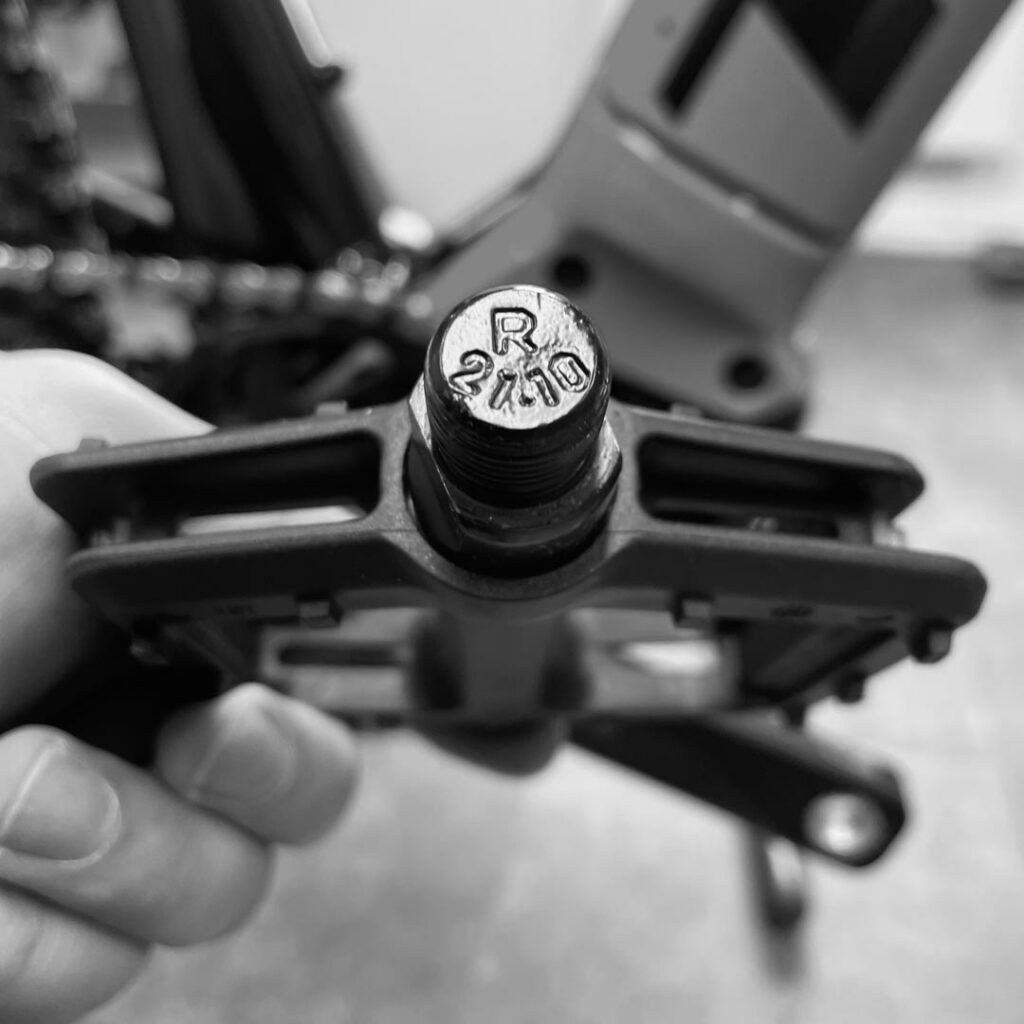
Bicycle pedals use different threads for the right and left side. The pedal side is usually marked on the end of the pedal shaft: R = “Right” (right, transmission side) and L = “Left” (left side).
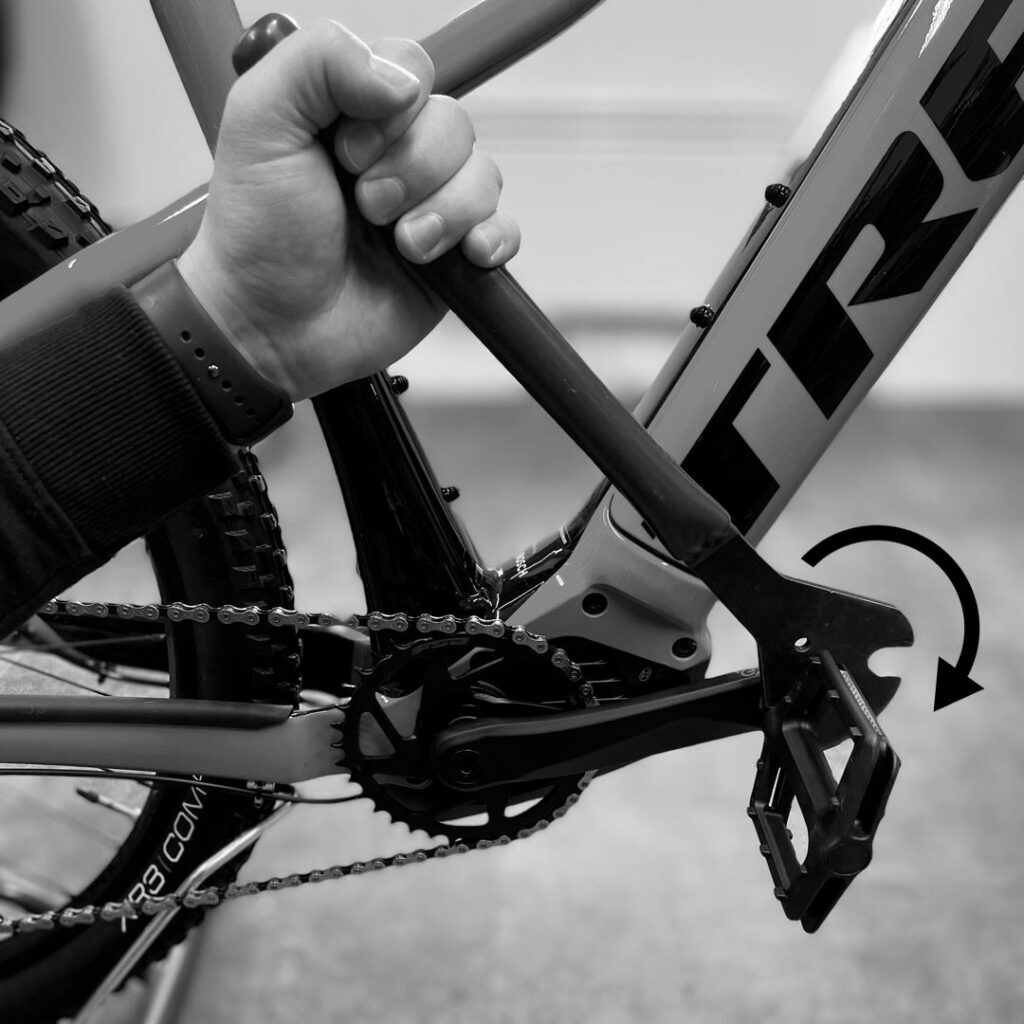
The right-hand pedal (transmission side) has a “normal” right-hand thread, so it tightens clockwise.
The left side (when looking at the wheel from the rear) is the so-called “wrong-handed” thread. This means that it is tightened counter-clockwise.
Things to note
The pedal shaft should start to rotate manually without the use of a tool. If this does not happen, check
again, that you are turning the pedal to the correct side and that the pedal shaft is not misaligned
in relation to the thread of the pedal comb.
A little grease can be added to the pedal shaft during installation. This makes it easier to remove the pedal
in the future.
The pedals must be tightened quite tightly, a pedal coming loose while driving can cause a dangerous situation and
the risk of injury. If the tightening torque is marked on the pedal cap or pedal, we recommend that you
to comply with it. Also remember to check the pedal lock at regular intervals!
Control bracket
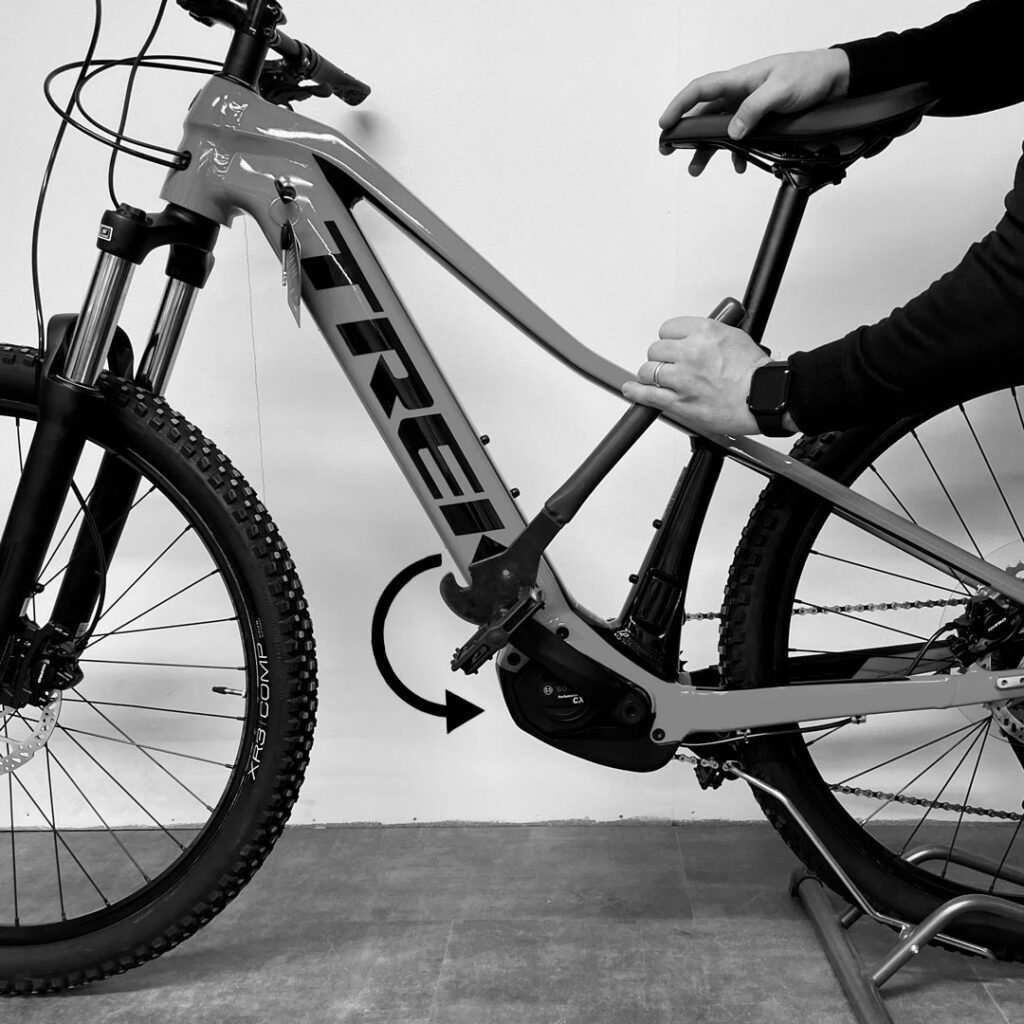
The handlebar bracket is the part that connects the handlebar tube of the front fork to the handlebar. It is therefore an important part that must be carefully tightened. There are two basic types of steering brackets: the side-tightening “aheadset” bracket and the traditional wedge-tightening steering bracket. Different manufacturers may have specific integrated steering solutions and in these cases we recommend that you refer to the installation and operating instructions provided by the manufacturer. The bike you order from our online shop will be delivered with the handlebars turned parallel to the frame and the instructions below will help you to turn and tighten the handlebars to a safe operating position.
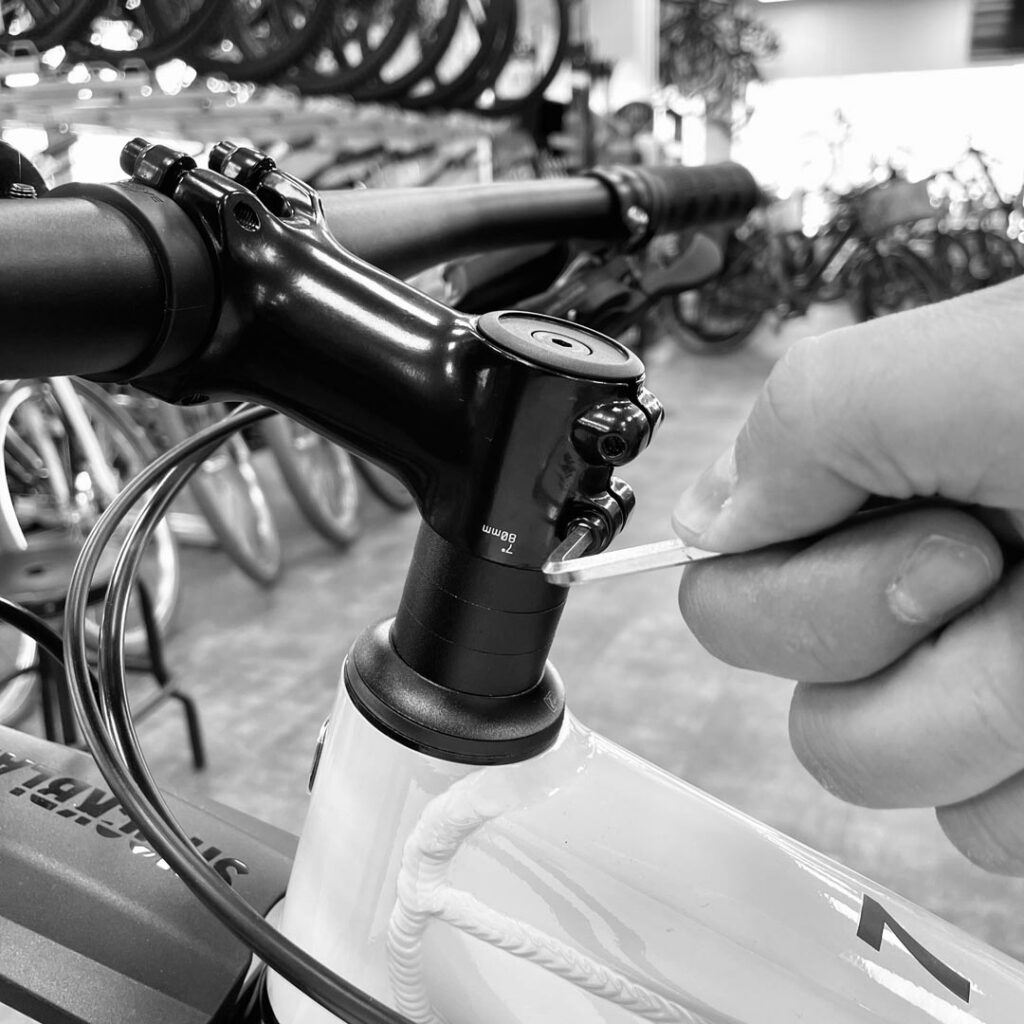
If your bike has a side-tightening handlebar bracket (as shown) and the handlebar is turned sideways, start by slightly loosening the bolts on the sides of the bracket. You will usually need a 4 mm Allen key (5 mm in some cases) to do this.
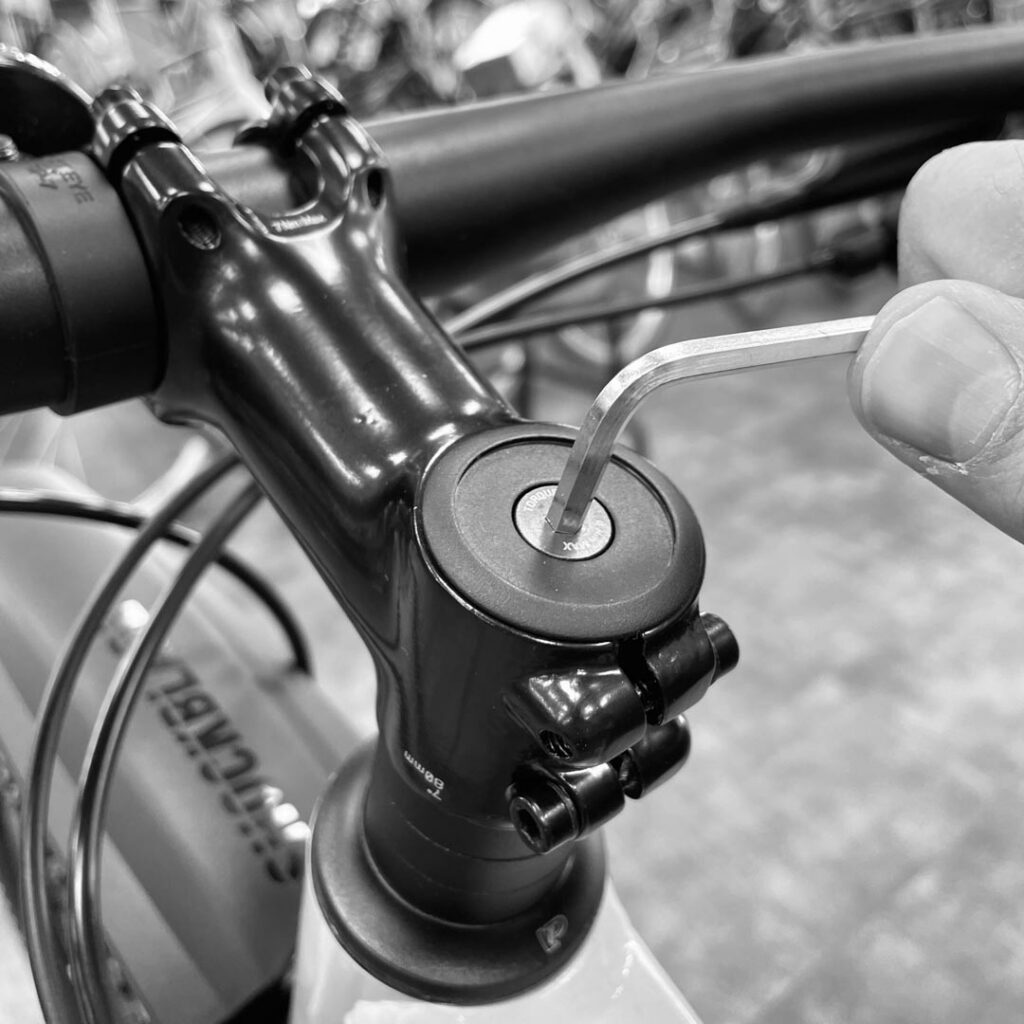
Once you have loosened the bolts on the sides of the handlebar bracket, the handlebar should swing to the centre without any difficulty. Next, check that there is no play in the guide bearing. This is done by turning the top bearing bolt clockwise. The bolt does not need to be tightened very hard, just enough to remove the clearance. Keep the front brake on and rock the wheel back and forth, feeling for any clearance. If no clearance is felt, you can now tighten the bolts on the sides of the handlebar bracket to the torque marked on the bracket.

Once you have tightened the handlebar bracket, lift the front end of the bike into the air and check that the steering is responsive. If the steering has bumps or feels sticky, it could be that the steering bearing is too tight. If so, you'll need to loosen the bracket mounting bolts and turn the top cap bolt slightly loose. Remember to tighten the bracket mounting bolts after adjustment!
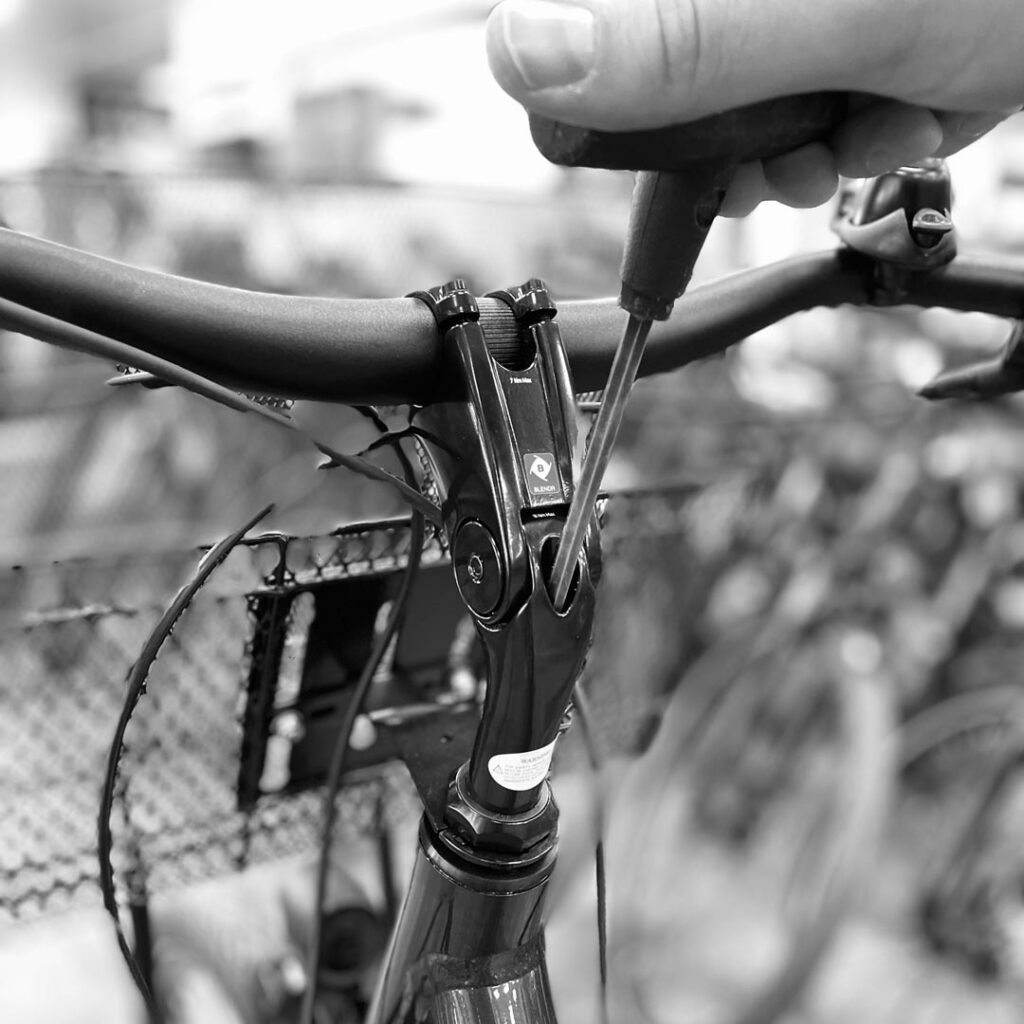
Wedge-tightening handlebar bracket
If your bike has a wedge-type handlebar mount (pictured) and you need to straighten the handlebars, it's easy. First, remove any rubber cover from the tensioner bolt. You will then need a long (usually) 6 mm Allen key. Loosen the bolt slightly by turning it counter-clockwise, straighten the handlebar and tighten the bolt. Secure the tightening further by standing with the front wheel between your legs and swinging the handlebar from side to side. The handlebar should not be able to turn.
Tip: When loosening the bolt on the wedge-shaped bracket, do not unscrew it all the way. The wedge in the guide bracket can drop the fork to the bottom of the guide tube and cause extra work.
Tip 2: A common misconception is that the large nuts at the base of the handlebar bracket affect the tightening of the bracket. However, they are only for adjusting the guide bearing.
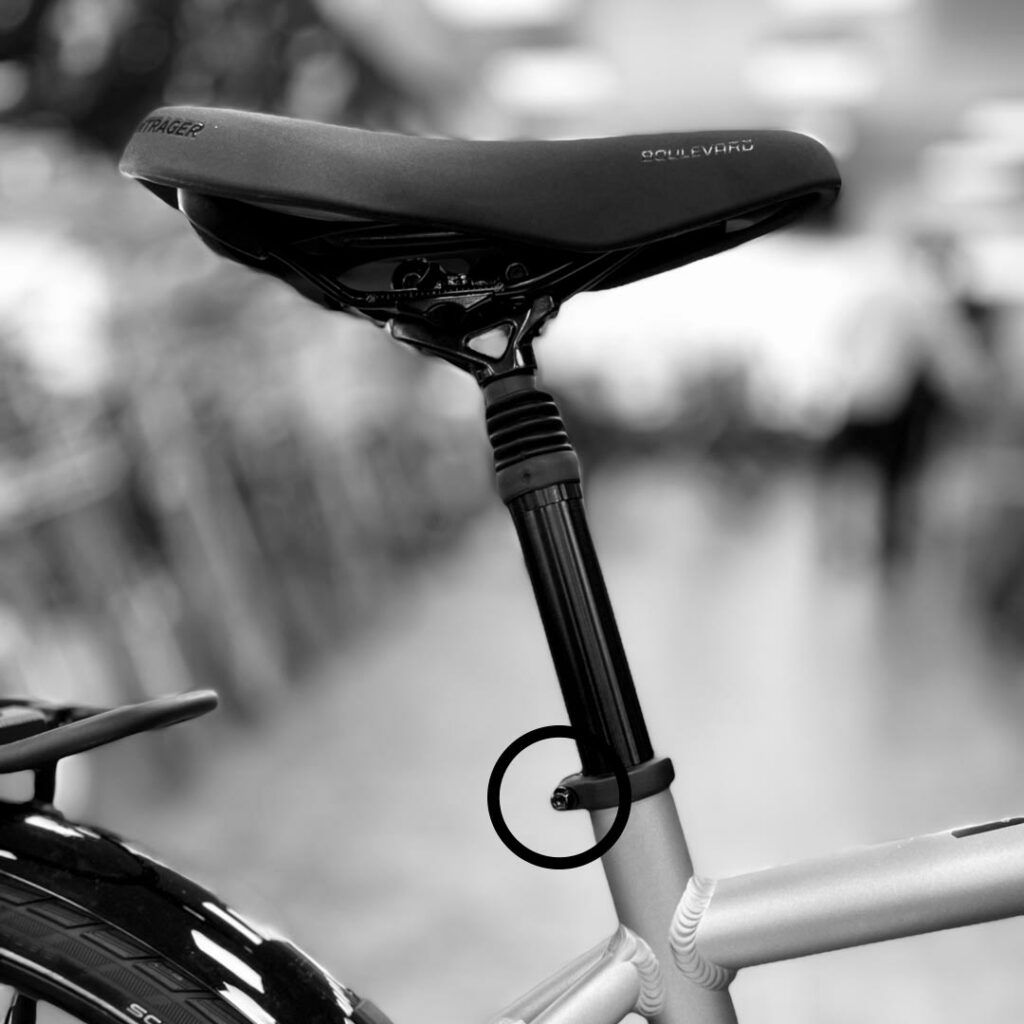
Saddle height adjustment
To adjust the height of the saddle, first loosen the saddle post tensioner bolt. Then slide the saddle post to the desired height and tighten the bolt. In some cases, the saddle post tensioner has a quick-release lever. In this case, open the lever, adjust the saddle height and close the lever.
Things to note
Never raise the saddle post above the permitted limit. The limit is marked on the arm of the saddle post (Minimum insertion). A saddle post raised too high may bend or, in the worst case, break. Also pay attention to the tension of the saddle post tensioner bolt and follow the values marked on the tensioner. If the tensioner is left too loose, the saddle post may spill or rotate. Tightening too tightly, on the other hand, will stress the structure of the tensioning ring and may, for example, impair the smooth operation of the lift mast.
Correct saddle height
The optimum height of the saddle is somewhat individual, but following these basic guidelines will get you off to a good start. Stand on the bike using a wall, doorway or assistant for support. Sit in the saddle and turn the crank so that one crank is pointing straight down. Place your heel on the pedal. With the heel on the pedal, the foot should be stretched out straight but still reach the pedal. When you start to ride normally, the tips of your feet will rest on the pedal, so your foot will also remain slightly hooked in the down position.
If the saddle is too low, you won't get all the power out of your legs. A saddle that's too high, on the other hand, can cause the pedal to “reach” with every pedal stroke, making it difficult to spin smoothly.


